|
SCARF SWAG - Options
& Variables:
Now that you understand
the basics of a scarf swag, let's take it a step further. This article discusses
several different variations to the scarf swag and how a slight alteration to
the basic pattern creates the desired effect.
Controlling The Length
of Leading Edge of Tails (Measure F):
Your tails will have a
slant which is one half the measure of your swag drop length. When the swag
shape is drawn, it slants into the tail, drawing the leading edge of the tail
up by that much. You can manipulate this slant edge:
Tails with no slant:
This gives a fuller look
to the finished tails and eliminates the need for a lining fabric since the
back of the fabric will not show when the treatment is hung. Fabricate your
scarf so that D and F measures are the same:
Draw the slant so that
the bottom line is the same measure as the top line. You are basically drawing
the tails in the shape of a parellelogram. The inside slant edge will be same
as the outside drop length.
Tails with higher slant:
Fabricate your scarf with
the following dimensions:
Measure F is the length
of the leading edge of the tails. Along the bottom of the scarf, measure from
the bottom of the swag outward F+1". Draw a line from the top corner
to your mark and use this as your cutting line for the scarf.
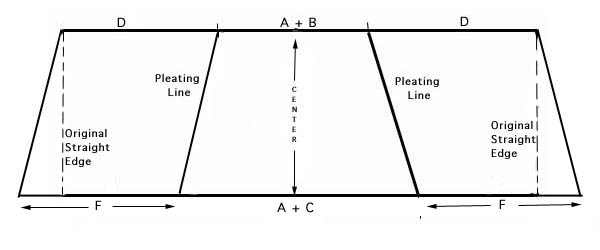
Two Swags On One Scarf:
Two swags can be pleated
on one scarf. It will not be a perfectly symmetrical look. However, as long
as the finished swags are not extra long, the fabric and casual style will
be forgiving.
Scarf Dimensions:
Length is the sum of
both tails 2(D) + Finished width & drop length of both swags 2(A+B)
+ 2" for ease and hems.
Width is calculated
the same as for a single swag treatment.
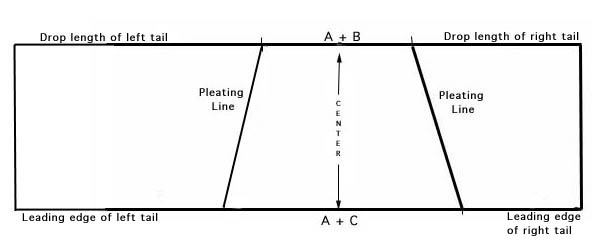
Drawing the pattern:
Find the center of your
scarf. This will be the pleat line between the two swags. From the center
at the top, measure the width of each swag (A+B). From the center at the
bottom, measure the bottom curve width of each swag (A+C). Draw slant lines
connecting the top and bottom measures. These will be your outside pleat
lines for each swag.
Follow standard directions
for marking and pleating the treatment. Because the swags are not pleated
from perfectly symmetrical pleat lines (the center pleat line is on the
straight of grain), there will be some distortion to the swags. Dressing
both swags to mirror-image each other will bring the entire treatment into
a symmetrically pleasing shape.
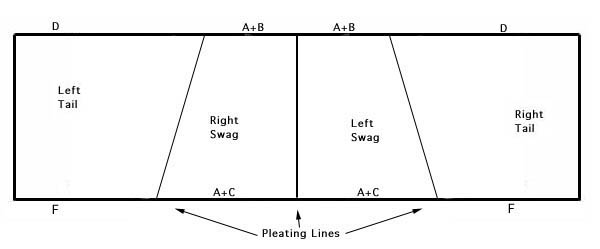
Multiple Swags On One
Scarf:
This treatment can be
fabricated with multiple swags on one scarf. It is patterned and assembled
from multiple pieces, but the end result mimics a single continuous scarf
treatment.
The trick here is drawing
the treatment out as a single swag with tails. Once drawn, the pattern is
cut apart at the pleating lines into three sections. Mark each section along
the cutting line to add a 1/2" seam allowance. You now have patterns
for the left and right tails and the swag sections:
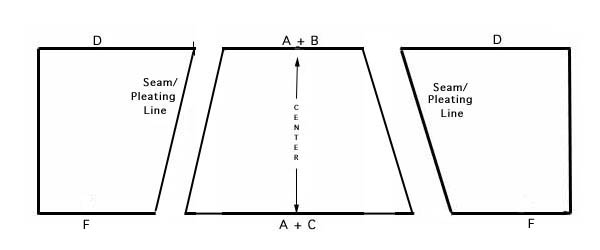
Note: If finished
treatment has different sized swags (combination of larger and smaller
windows on a single wall), simply draw and cut a swag pattern shape for
each size required.
The face fabric (and lining)
pieces are all cut as separate pieces, then stitched together at the pleating
lines. Pressed flat, the treatment will assume a curved shape.
Finish the scarf as if
it were a single swag - either lined or unlined. Trim the seams as close as
possible to minimize bulk. Turn, press, lay flat. Your seam lines are your
pleating lines. Mark and pleat following standard directions.
Multiple fabrics &/or
Contrast Lining in Tails:
Follow the steps under
Multiple swags On One Scarf to break your finished treatment into pieces.
You can now cut each of the face pieces separately. This allows you to fabricate
in separate fabrics, cut the swag sections on the bias for a softer drape
and turn the fabric pattern direction on the tails (as in the case with obvious
stripes or plaids).
This also allows you to
cut the lining pieces from standard lining for the backs of the swags and
from contrast or self fabric for the tails.
Asymmetrical Tails:
Once the finished drop
lengths of the right and left tails are established, cutting and finishing
the scarf and marking and pleating the swag follow exactly the same steps
as for a standard symmetrical look. The only difference is that your swag
will not be drawn in the center of the scarf:
A FINAL
WORD:
This article was written
to assist you in marking and pleating a scarf swag for a smooth installation.
For more detailed information
on how to manipulate a scarf swag, consider ordering The
Professional Workroom Handbook of Swags, Volume 1. The chapter on scarf
swags gives more detail than is contained in this article. It contains information
on mounting options as well as pictures and diagrams to aid your understanding.
This book is a valuable resource for new and veteran workrooms alike. It takes
the guesswork out of scarfswags.
Return to the Sew Easy Windows articles Table of Contents page.
|